The rapid development of laser technology has led to technological innovation in the field of light detection. Although it is a field of passive development, the development of detectors can basically be synchronized with the development of laser technology to meet various measurement and even extreme measurement needs.
A laser power meter is an instrument used to test the power of a continuous laser or the average power of a pulsed laser over a certain period of time.
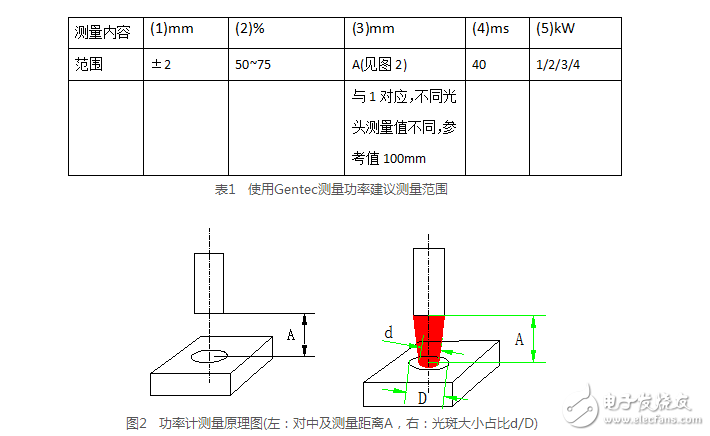
Power meter usageFor the first time using the power meter, a measurement standard needs to be established, and subsequent measurements are performed on the basis of this standard to ensure the consistency of the measurement.
Usually, the power meter is fixed on a horizontal workbench. When measuring, the robot moves the laser head to the measuring point to ensure that the guiding light and the power meter's receiving surface (round surface) are basically centered, and the deviation is within 2 mm.
Measurement standards include: spot and power meter are exposed to light
(1), the ratio of light spot area to the spot and power meter
(2), the lower end of the laser head blowing module and the upper surface of the power meter
(3), measuring the light time
(4), measuring optical power
(5) and other parameters.
For the first measurement, the standard measurement program and the robot motion trajectory are written, the teaching path is taught, and the position and posture of the robot are precisely controlled. The final measurement point needs to be accurately arrived. In order to prevent the position of the measuring point from moving, it is difficult to retrieve. It is necessary to use the final measuring point attitude as the reference and shift upward by about 10 mm as the error-proof point of the measuring point. It also needs to arrive accurately.
Before the measurement, ensure that there is no interference from foreign objects such as welding wire, dirt, oil, water, etc. in the measuring optical path! The protective lens is clean and meets the measurement requirements. At the same time, remove the protective cover!
The power measurement interval is at least 1 min, the maximum energy is 200 J. If 4 kW is used, the maximum measurement time is less than 50 ms. If 3 kW is used, the maximum measurement time is less than 66 ms. The recommended measurement time is 40ms.
For subsequent use, only one power (such as 3 kW) is needed to determine the stability of the power. If the stability exceeds ±5%, re-measure after removing the measurement error, consider replacing the protective lens or checking the cleanliness and integrity of the power meter's light body.
Multiple times of the same power output time measurement, the power stability exceeds ±5%. Under the premise of no damage to the power meter, it is necessary to check the cleanliness of the internal optical path of the laser head (this operation must be authorized by the laser head manufacturer or laser head manufacturer). get on).
If the power meter is damaged during use or the measurement error is too large due to improper operation, consider the power meter recalibration.
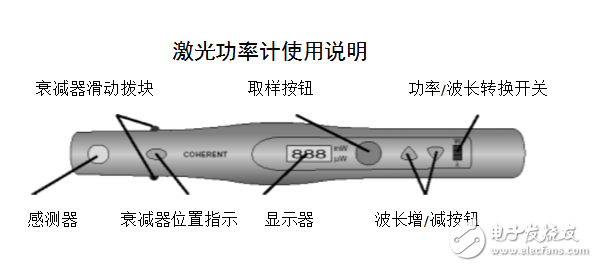
1. Turn the power/wavelength switch to the “W†position.
2. If the laser power to be tested is >10mW, move the “Attenuator Slide Block†to the sensor end so that the power attenuator covers the sensor. At this time, the “Attenuator Position Indicator†is displayed in black. When the attenuator is in the working position, the measured power shall not exceed 30W/cm2. When the attenuator is not in the working position, the “attenuator position indicator†is displayed in yellow. At this time, the measured power shall not exceed 0.5W/cm2.
3. Press and hold down the “sampling button†of the power meter.
4. Insert the power meter into the laser beam and align the center of the sensor with the laser beam for at least 2 seconds. Note: The sensor can be placed close to the normal incidence of the beam for maximum measurement accuracy and minimal back reflection loss. If the optical power meter beeps, beeps, and the three dotted lines "- - -" appear on the display, the power level measured at this time has exceeded the maximum power range.
5. Release the sampling button to remove the optical power meter from the beam.
6. When the sampling button is pressed, the measured power peak reading is displayed on the display. After 10 seconds, the optical power meter is automatically turned off.
Wavelength setting:1. Turn the “Power/Wavelength Switch†to λ and the current wavelength reading will be displayed on the display.
2. Use the "wavelength increase/decrease button" to adjust the wavelength from 400nm to 1064nm. (When the wavelength exceeds 999 nm, the display reads from 000 to 64, representing 1000 to 1064.)
Note: The setting of the wavelength has been stored, and changing the setting of the wavelength is unnecessary unless the range of the wavelength changes.
caveat!
If the specified maximum power density range is exceeded during use, it will cause damage to the sensor of the laser power meter.
Technical Parametersmodel
Sensor type: silicon component
Wavelength range: 400~1064nm
Maximum measuring power: 10Mw
Accuracy: ±5%
Built-in attenuator: 1W
Maximum measured power density: 0.5W/cm2
Maximum built-in attenuator measures power density: 30W/cm2
Minimum power full scale: 9.99μW
Minimum power resolution: 0.01μW
Minimum visual power: 0.5μW
Peak sampling time: 2 seconds
Display retention time: 10 seconds
Power display range: 9.99μW ~ 999 mW
Battery life: 180,000 times (12 seconds / time)
Overload sound alarm: beep, toot
Maintenance and maintenance of the power meterThe power meter is a precision instrument and needs to be strictly in accordance with the requirements of use to ensure the accuracy and stability of the measurement.
The best use temperature is about room temperature (25 ° C), and ensure that it can be operated in an environment when it is not used.
The energy range used is suitable for 50~75% of the maximum energy. It is relatively suitable to measure the spot size when measuring 40-40% of the effective measurement size;
When using for the first time, it is necessary to measure the power value corresponding to the 0 input for calibration;
It is recommended to measure the gap time to 3min;
Disposable Vape,Disposable Vape Flum Float,Randm Vape,Iplay Vape
Nanning Nuoxin Technology Co., LTD , https://www.nx-vapes.com